Skills in this Project:
Solidworks
Keyshot Rendering/Animation
Illustrator/Premiere Pro
3D Printing

Prototyping

Video Editing
Re-Designing the DFMA Charger
Back to Designing:
To achieve an improved design from the previous, I wanted to take a new design direction. Due to currently having an iPhone and Airpods on 2 different Apple MagSafe chargers, I thought this would be the perfect opportunity to create a MagSafe dock that can incorporate both into one device. But also be aesthetically appealing for any inside environment and be able to follow the Apple design philosophy. Where the design will be inspired by current Apple products and promotional material.

What is MagSafe Max?
MagSafe Max is a theoretical collaboration between Apple and myself in creating a new product in the MagSafe lineup that achieves charging two compatible devices in one. This is something that Apple currently doesn't offer in their lineup. The main aim is to charge AirPods and iPhones. To make your workspace more organised and simpler.
Promotional Material:
KeyShot 10 Pro was heavily used alongside Solidworks to create the form of the MagSafe Max. The aim was to have this form be easily suited to modern indoor environments in your home and be easily assembled. Such environments include kitchens, benches, tables, and living rooms. The elegant and sophisticated form follows the Apple design philosophy as much as possible, in terms of the curvature, colours, and material choices. The promotional material below is inspired by previous Apple promotional posters.
KeyShot was used to be able to showcase how the design is displayed in its environment and its particular features. Illustrator and Lightroom were used to enhance the renders more.


Context Images:

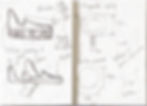
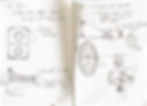
Initial Sketches:
This design was the first to be used with this 3D printer, which required me to learn new techniques in spray paint to achieve a textured cement pattern on the 3D printed parts. While also programming the 3D printer to achieve high-quality finishes on the parts to be easily sanded.


3D Printing the Design:
This design was the first to be used with this 3D printer, which required me to learn new techniques in spray paint to achieve a textured cement pattern on the 3D printed parts. While also programming the 3D printer to achieve high-quality finishes on the parts to be easily sanded.


Timelapse of the final stages to one of the 3D prints
Development Phases:
The design went through 4 different iterations which included how the model would be assembled. initially would be through screw bosses, which proved not to fully seal off the parts together. This then leads to incorporating nut and bolt holes to manually combine the parts together. the process was time-consuming and still didn't provide a satisfactory result. Led to using pin bosses where the weight of the electronics would weigh down the parts enough to fully seal off each part. Another issue was found was the weight distribution of the iPad dock where the part would fully over due to uneven weight distribution.

Assembling the Parts:
Many iterations of the parts were produced in order for them to easily fit the electronics and be easily assembled through different methods. The middle black coloured part was aimed to be produced out of nylon filament but was unsuccessful, due to material warping and moisture build-up. Leading to an unsatisfactory output. This led to using a Tough PLA material to be used instead, due to its similar attributes to ABS but being more reliable than Nylon.


Final Model:
Below showcases the final model with the MagSafe chargers installed with the rest of the parts that were 3D printed.

What I learnt:
This design required a new level of thinking in terms of basing the design on a companies philosophy and marketing persona. Furthermore, to how the model would be assembled, utilising screw bosses/bin bosses throughout the design and 3D printing to high resolution. While aiming to use new materials like Nylon and PLA Tough Black rather than painting, as it was damaged in the first prototype when trying to assemble. learning tolerances as well required a new level of thinking during the CAD modelling process. Overall an enjoyable project that allowed me to be inspired by a massive design orientated company.